Showing posts with label crafts. Show all posts

Saturday, 25 April 2015

18 Spring Flower Crafts

Here's a round-up of 18 different Spring flower crafts you can have fun with this Spring time with your little ones


18 spring flower crafts


Originally on my blog - Serenity You

Thursday, 20 March 2014

Paper Case Flowers


Is anyone else missing spring? There is to much snow for me and not enough colour. So to change this and also to give the children something to do while I did the ironing I gave them this.
20130327-105009.jpg
oh and I forgot to add the glue!!
You can also use anything else you have to hand.
The girls were excited as to what we was going to do and couldn’t wait to get started. I explained to the girls we was using the cases as a flower and the straws as the stems.
First colour your ‘flower’ case in.
20130327-120831.jpg
Using sticky tape, stick the straw to the back if the case. You can glue a pompom to the front or use stickers, Posy even used cut up wiol
20130327-121047.jpg
And there you have your simple flower. This activity kept the girls busy for 2 hours, and even Izlles joined in making Daisy’s.
20130327-121401.jpg
I personally think these are gorgeous, and they are so simple yet effective.
I now have 3 bouquets of flowers to cheer up my living room.

This post was originally published on What to do with the Children

Wednesday, 12 March 2014

Lolly Stick Knitting


This craft is more for older children or for you to do for your children.
I have recently discovered finger knitting. I found a good YouTube tutorial on how to do it here. So using this I quickly finger knitted Posy’s teddy a scarf.
Posy was happy about the new scarf. But making this also gave me another idea, to make it bigger.
I quickly got some craft sticks, but popsicle/lolly sticks will work just as well. I glued these onto a piece of corrugated cardboard, and glued another piece of card on top.
20130321-115219.jpg
I then used the sticks instead of fingers. I weaved the wool like shown below.
20130321-115519.jpg
20130321-115540.jpg
You need to go back and forth weaving until you have 2 lines of wool either side like the pic above. You then using the last stick pull the bottom loop up and over the stick leaving the top loop one where it is. Continue to do this until you just have 1 row of the wool. when you get to the thread just place this to the back of the board.
20130321-122359.jpg
Weave 1 more line of wool back and forth just once until you once again have 2 lines of wool, pull the bottom loop up and over the stick leaving just 1 row again. Keep repeating and your knitting will quickly grow.
20130321-122941.jpg
Keep going until you have your desired length.
To finish you take the last loop and place it on top of the loop next to it.
20130321-123329.jpg
You then use this as the second loop so pull the bottom loop up and over the top. Then repeat the process take the last loop place it on the stick next to it and pull up and over. Keep repeating until you have the last loop.
20130321-123909.jpg
Cut the wool and thread the end of it threw the loop. Take it off the loop and tie both ends off.
20130321-124041.jpg
Posy was ecstatic that she and her teddy had the same scarf.
20130321-124126.jpg

This post was originally published on What to do with the Children

Friday, 7 March 2014

Tuesday, 23 April 2013

Paper Lantern Hot Air Balloon


We've been trying to do regular art projects with the kids.
They love getting to pick through fabrics, match colors, glue things, and make a mess.
I love seeing their creativity and personalities shine through their art.
Last night we made some cute little hot air balloons that will eventually hang among clouds and lights in the playroom.


Here is the how to:
    For each balloon you will need:
1 paper lantern 10, 14, or 16 inch
Fabric/pendants/decor
2 long pieces of yarn ~30"
cardboard square 3-5 inches
burlap square cut 4 inches wider than cardboard
hot glue and craft glue
scissors

 We used craft glue to attach our decorations.
Didn't want to burn little fingers!

To make the basket:
 Start by gluing your card board (hot glue) to the center of your burlap square.
Next, you will fold in each corner, tuck and glue.
After it is glue is cooled, snip off the corners inside.
It will look like this:
  
To attach the basket:
 
Find the center of each piece of yarn. 
Glue to center of the bottom of the basket.
Then glue at a diagonal from corner to corner.
    Repeat with second piece of yarn going from the other corners, forming an "X" on the bottom.
Now you will glue your yarn up the sides of each corner.
 This is what you should have:

Now you just need to glue it to your lantern!
I did this 5 different ways....this is one way.
You want to make sure you are keeping your yarn even.
Measure and mark each string or just eyeball it, like I did.
 Be sure you are attaching it to the BOTTOM of your lantern:
 

Glue strings in a + pattern around center hole.
Giving 5-6 inches between basket and lantern.
 (Pretend the gluing looks perfect. Photographing and gluing at the same time is tricky.)

Now just run your strings up the side of the lantern and glue at the top!
Ta-Da!
We hung ours up to "finish drying" along the living room.
Which really means until the light fixtures arrive and I actually hang them in the proper place in the playroom.


I order my penants and lanterns from the Knot.
Very worth it for the colors and buying a lot at once!
Otherwise, I'd go to the local craft store. 


This post was originally published on The Crafty Woman

Monday, 22 April 2013

Bird Feeder Kiddo Craft


We did a fun little spring craft today and I thought I'd share!

Toilet paper roll, bird seed and peanut butter.
Thats it.
 I  let my littles use a plastic leftover party knief to rub the peanut butter on the toilet paper roll.
And as for the bird seed, I filled up a tupperware bin and let them roll it in about 1/2 inch of bird seed.

Heres to (almost) spring!


This post was originally published on Ashlea with an A

Wednesday, 27 March 2013

Easter Crafts for the Kids


thumbprint egg basket
Thumbprint Easter Baskets from Silly Eagle Books


Easter Egg Collage from Mama's Like Me


Home made Easter Cards from A Thrifty Mum

rockin-peeps18ww-450x450
Rocking Peeps from Crafty Journal

Easter Craft
Egg Shell Painting from Blog Me Mom

Wednesday, 13 March 2013

Beaded Shamrocks for St. Paddy's Day


clover, Ireland, preschool and kindergarten crafts
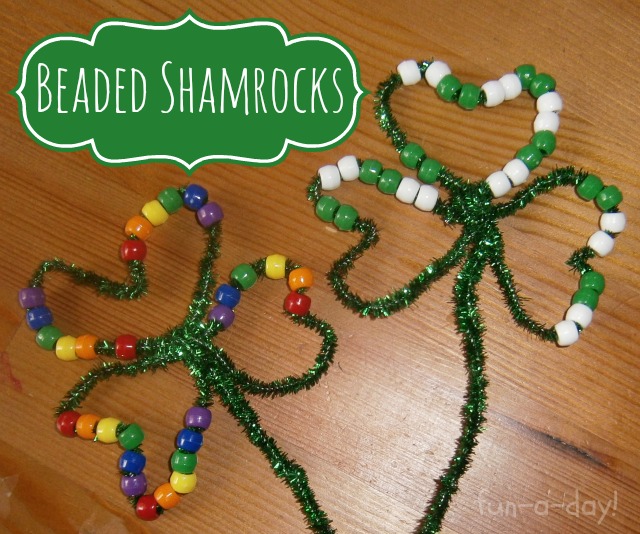
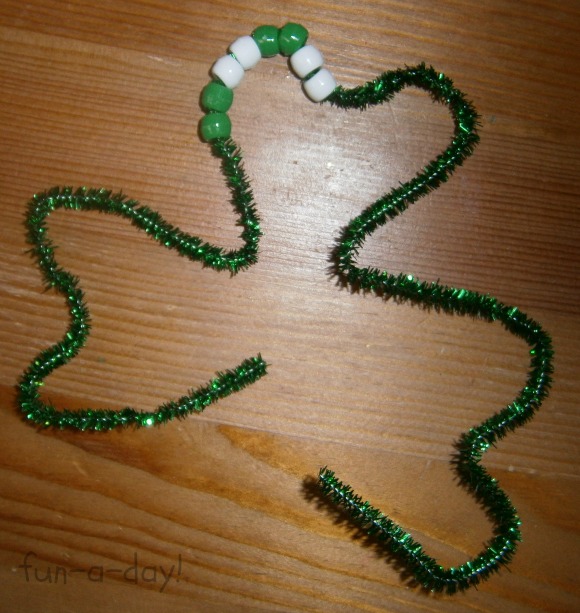
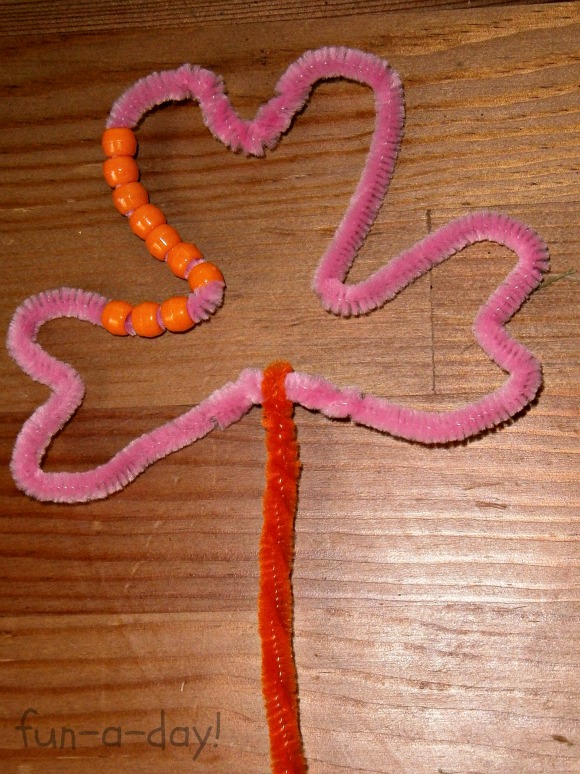
Engineer, Captain America, and I made beaded shamrocks this afternoon (while Frat Boy was napping).  I twisted two pipe cleaners together, bent them into a basic shamrock, and then let the boys add the beads.  Engineer made a variety of patterns with his pony beads, while Captain America chose to stick with just one color. 
clover, Ireland, preschool and kindergarten crafts, white and green patterns, pipe cleaners, chenille steams
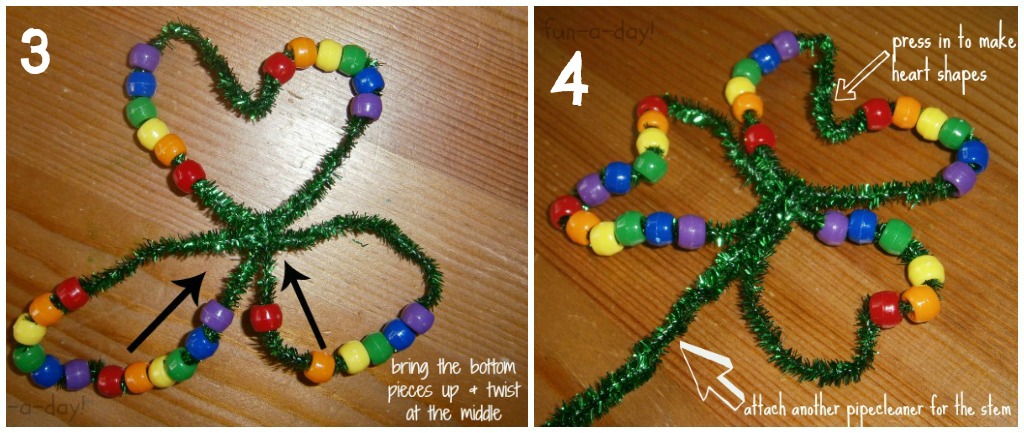
It was interesting to watch the boys as they navigated the twisty pipe cleaners with the beads.  I was making my own at the time, so I can attest that it certainly works your fingers!  Definitely a great activity for fine motor development.  When they were done, I helped attach another pipe cleaner for the stem.
clover, Ireland, preschool and kindergarten crafts, pony beads, pipe cleaners, chenille steams
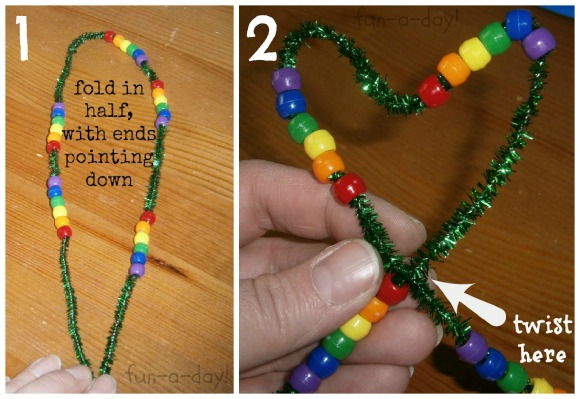
Engineer pointed out that our original shamrocks looked more like flowers, so we went back to the drawing board.  The below method is what worked better for us.  Again, I twisted two pipe cleaners together.  This time, though, I left them in a straight line.  Engineer and I worked together to make two different patterns on our pipe cleaners — one was green and white, while the other was a rainbow pattern.
clover, Ireland, preschool and kindergarten crafts, white and green patterns, rainbow patterns, pony beads, pipe cleaners, chenille steams
Once the patterns were complete, I folded the pipe cleaners in half.  I created one heart shape at the curved end of the folded pipe cleaner.  I then twisted underneath that heart to help it holds it shape.  I folded the remaining edges up and twisted them in the middle.  Then I pushed them into heart shapes as well.  Once all that was done, Engineer and I added another pipe cleaner for the “stem” of the shamrock.
clover, Ireland, preschool and kindergarten crafts, white and green patterns, rainbow patterns, pony beads, pipe cleaners, chenille steams
Engineer inspected all of the beaded shamrocks when they were done.  Thank goodness they all passed inspection!  :)  He definitely preferred the second set of shamrocks, and I must admit I liked them better as well.
clover, Ireland, preschool and kindergarten crafts, white and green patterns, rainbow patterns, pony beads, pipe cleaners, chenille steams
Sorry for the lack of kiddos in the pictures, but the boys just weren’t having it!  I was permitted to take pictures of the crafts, but Engineer and Captain America were feeling camera shy today.  :)

This post was originally published on Fun-A-Day!

Wednesday, 27 February 2013

Activity Sticks


"Mum, I'm bored!"

How many times have you heard your kids say this?
Too many, if your kids are like mine

So I made some activity sticks.
On coloured lollipop sticks I wrote different activities, they simply pick one and do what it says.
I couldn't find anything to keep the sticks in so I just spray painted (Love that stuff) an empty innocent veg pot.


Here are a few of the activities:
play with lego
watch a dvd
make a collage
play hide and seek
play monsters
pull weeds
read a book
play on the wii
go for a walk
go to the park
paint
have a water fight
have a dance competition
do jumping jacks
have a fashion show
karaoke
put on a play
write a story
draw a self portrait
play with figures
play restaurants
and loads more


This post was first seen on Serenity You
Related Posts Plugin for WordPress, Blogger...